| |
| title: "Home" |
| |
|
|
| version: 2.2.0 |
|
|
| Welcome to the Document Redaction App documentation. This site provides comprehensive documentation for the Document Redaction App. |
|
|
| Navigate through the sections to learn how to install, use, and manage the application. Below is a brief introduction to the app, followed by **complete installation instructions** (PyPI, source, and Docker overview). |
|
|
| |
|
|
| Redact personally identifiable information (PII) from documents (pdf, png, jpg), Word files (docx), or tabular data (xlsx/csv/parquet). Please see the [User Guide](https://seanpedrick-case.github.io/doc_redaction/src/user_guide.html) for a full walkthrough of all the features in the app. |
|
|
|  |
| |
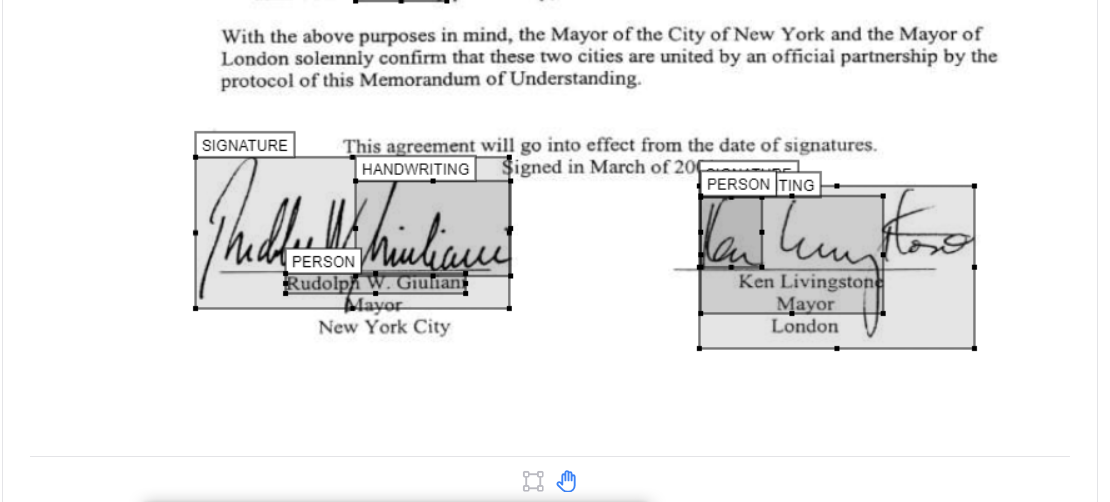
| To identify text in documents, the 'Local' text extraction uses PikePDF, and OCR image analysis uses Tesseract, and works well only for documents with typed text or scanned PDFs with clear text. Use AWS Textract to extract more complex elements e.g. handwriting, signatures, or unclear text. For PII identification, 'Local' (based on spaCy) gives good results if you are looking for common names or terms, or a custom list of terms to redact (see Redaction settings). AWS Comprehend gives better results at a small cost. |
|
|
| Additional options include, choosing the type of information to redact (e.g. people, places), custom terms to include/ exclude from redaction, fuzzy matching, language settings, and whole page redaction. After redaction is complete, you can view and modify suggested redactions on the 'Review redactions' tab to quickly create a final redacted document. |
|
|
| NOTE: The app is not 100% accurate, and it will miss some personal information. It is essential that all outputs are reviewed **by a human** before using the final outputs. |
|
|
| |
|
|
| |
|
|
| |
|
|
| The application needs **Tesseract** (OCR) and **Poppler** (PDF utilities) on your system before Python packages will work fully. |
|
|
| |
|
|
| 1. **Tesseract:** Install from the [UB Mannheim Tesseract wiki](https://github.com/UB-Mannheim/tesseract/wiki). During setup, add Tesseract to the system PATH. |
| 2. **Poppler:** Download from [Poppler for Windows](https://github.com/oschwartz10612/poppler-windows), extract to a permanent folder, and add the `bin` directory to your system PATH. |
|
|
| Verify in a new terminal: `tesseract |
|
|
| |
|
|
| ```bash |
| sudo apt-get update && sudo apt-get install -y tesseract-ocr poppler-utils |
| ``` |
|
|
| |
|
|
| ```bash |
| sudo dnf install -y tesseract poppler-utils |
| ``` |
|
|
| |
|
|
| Use a virtual environment (recommended): |
|
|
| ```bash |
| python -m venv venv |
| |
| .\venv\Scripts\activate |
| |
| source venv/bin/activate |
| ``` |
|
|
| |
|
|
| The package is published on [PyPI](https://pypi.org/project/doc-redaction/) as **doc-redaction**; the import name is **`doc_redaction`**. |
|
|
| ```bash |
| pip install doc_redaction |
| ``` |
|
|
| Optional extras (PaddleOCR, VLM stack — see `pyproject.toml` on the repository for exact extras): |
|
|
| ```bash |
| pip install "doc_redaction[paddle,vlm]" |
| ``` |
|
|
| After a PyPI install you get: |
|
|
| - The **`cli_redact`** console script (same behaviour as `cli_redact.py` in the repo). |
| - The **programmatic API** documented in [Package API usage (Python)](src/package_api_usage.qmd). |
|
|
| **Gradio web UI:** The full `app.py` UI is easiest to run from a **repository clone** (see below) or via **Docker**; a PyPI install is optimised for library and CLI use. |
|
|
| |
|
|
| ```bash |
| git clone https://github.com/seanpedrick-case/doc_redaction.git |
| cd doc_redaction |
| pip install -e . |
| ``` |
|
|
| Lightweight (no Paddle/VLM extras): |
|
|
| ```bash |
| pip install -e . |
| ``` |
|
|
| Full extras from the repo: |
|
|
| ```bash |
| pip install -e ".[paddle,vlm]" |
| ``` |
|
|
| Alternatively, `requirements_lightweight.txt` or `requirements.txt` from the repository root (see [README on GitHub](https://github.com/seanpedrick-case/doc_redaction) for GPU notes for Paddle and Torch). |
|
|
| |
|
|
| From the repository root, with dependencies installed: |
|
|
| ```bash |
| python app.py |
| ``` |
|
|
| Open the local URL shown in the terminal (typically `http://127.0.0.1:7860`). |
|
|
| |
|
|
| - **PyPI install:** `cli_redact |
| - **Source checkout:** `python cli_redact.py |
|
|
| |
|
|
| For examples that mirror each Gradio `api_name` using the CLI-first Python API, see **[Package API usage (Python)](src/package_api_usage.qmd)**. |
|
|
| |
|
|
| For container-based installs, AWS CDK, and advanced deployment, see the [App installation guide (with CDK)](src/installation_guide.qmd) and the [Dockerfile](https://github.com/seanpedrick-case/doc_redaction/blob/main/Dockerfile) in the repository. |
|
|
| |
|
|
| Application settings are typically loaded from `config/app_config.env`. A full variable reference is on the site under [App settings management guide](src/app_settings.qmd) and in the GitHub repository documentation. |
|
|
| |
|
|
| |
|
|
| - [User guide](src/user_guide.qmd) |
| - [Package API usage (Python)](src/package_api_usage.qmd) |
| - [App installation guide (with CDK)](src/installation_guide.qmd) |
| - [App settings management guide](src/app_settings.qmd) |
|
|
