Title: Examples - ntfy
URL Source: https://docs.ntfy.sh/examples
Markdown Content:
There are a million ways to use ntfy, but here are some inspirations. I try to collect [examples on GitHub](https://github.com/binwiederhier/ntfy/tree/main/examples), so be sure to check those out, too.
Info
Many of these examples were contributed by ntfy users. If you have other examples of how you use ntfy, please [create a pull request](https://github.com/binwiederhier/ntfy/pulls), and I'll happily include it. Also note, that I cannot guarantee that all of these examples are functional. Many of them I have not tried myself.
Cronjobs[¶](https://docs.ntfy.sh/examples#cronjobs "Permanent link")
--------------------------------------------------------------------
ntfy is perfect for any kind of cronjobs or just when long processes are done (backups, pipelines, rsync copy commands, ...).
I started adding notifications pretty much all of my scripts. Typically, I just chain the curl call directly to the command I'm running. The following example will either send _Laptop backup succeeded_ or ⚠️ _Laptop backup failed_ directly to my phone:
```
rsync -a root@laptop /backups/laptop \
&& zfs snapshot ... \
&& curl -H prio:low -d "Laptop backup succeeded" ntfy.sh/backups \
|| curl -H tags:warning -H prio:high -d "Laptop backup failed" ntfy.sh/backups
```
Here's one for the history books. I desperately want the `github.com/ntfy` organization, but all my tickets with GitHub have been hopeless. In case it ever becomes available, I want to know immediately.
```
# Check github/ntfy user
*/6 * * * * if curl -s https://api.github.com/users/ntfy | grep "Not Found"; then curl -d "github.com/ntfy is available" -H "Tags: tada" -H "Prio: high" ntfy.sh/my-alerts; fi
```
You can also use [`ntfy-run`](https://github.com/quantum5/ntfy-run) to send the output of your cronjob in the notification, so that you know exactly why it failed:
```
0 0 * * * ntfy-run -n https://ntfy.sh/backups --success-priority low --failure-tags warning ~/backup-computer
```
Low disk space alerts[¶](https://docs.ntfy.sh/examples#low-disk-space-alerts "Permanent link")
----------------------------------------------------------------------------------------------
Here's a simple cronjob that I use to alert me when the disk space on the root disk is running low. It's simple, but effective.
```
#!/bin/bash
mingigs=10
avail=$(df | awk '$6 == "/" && $4 < '$mingigs' * 1024*1024 { print $4/1024/1024 }')
topicurl=https://ntfy.sh/mytopic
if [ -n "$avail" ]; then
curl \
-d "Only $avail GB available on the root disk. Better clean that up." \
-H "Title: Low disk space alert on $(hostname)" \
-H "Priority: high" \
-H "Tags: warning,cd" \
$topicurl
fi
```
SSH login alerts[¶](https://docs.ntfy.sh/examples#ssh-login-alerts "Permanent link")
------------------------------------------------------------------------------------
Years ago my home server was broken into. That shook me hard, so every time someone logs into any machine that I own, I now message myself. Here's an example of how to use [PAM](https://en.wikipedia.org/wiki/Linux_PAM) to notify yourself on SSH login.
/etc/pam.d/sshd /usr/bin/ntfy-ssh-login.sh
```
# at the end of the file
session optional pam_exec.so /usr/bin/ntfy-ssh-login.sh
```
```
#!/bin/bash
if [ "${PAM_TYPE}" = "open_session" ]; then
curl \
-H prio:high \
-H tags:warning \
-d "SSH login: ${PAM_USER} from ${PAM_RHOST}" \
ntfy.sh/alerts
fi
```
Collect data from multiple machines[¶](https://docs.ntfy.sh/examples#collect-data-from-multiple-machines "Permanent link")
--------------------------------------------------------------------------------------------------------------------------
The other day I was running tasks on 20 servers, and I wanted to collect the interim results as a CSV in one place. Each of the servers was publishing to a topic as the results completed (`publish-result.sh`), and I had one central collector to grab the results as they came in (`collect-results.sh`).
It looked something like this:
collect-results.sh publish-result.sh
```
while read result; do
[ -n "$result" ] && echo "$result" >> results.csv
done < <(stdbuf -i0 -o0 curl -s ntfy.sh/results/raw)
```
```
// This script was run on each of the 20 servers. It was doing heavy processing ...
// Publish script results
curl -d "$(hostname),$count,$time" ntfy.sh/results
```
Ansible, Salt and Puppet[¶](https://docs.ntfy.sh/examples#ansible-salt-and-puppet "Permanent link")
---------------------------------------------------------------------------------------------------
You can easily integrate ntfy into Ansible, Salt, or Puppet to notify you when runs are done or are highstated. One of my co-workers uses the following Ansible task to let him know when things are done:
```
- name: Send ntfy.sh update
uri:
url: "https://ntfy.sh/{{ ntfy_channel }}"
method: POST
body: "{{ inventory_hostname }} reseeding complete"
```
There's also a dedicated Ansible action plugin (one which runs on the Ansible controller) called [ansible-ntfy](https://github.com/jpmens/ansible-ntfy). The following task posts a message to ntfy at its default URL (`attrs` and other attributes are optional):
```
- name: "Notify ntfy that we're done"
ntfy:
msg: "deployment on {{ inventory_hostname }} is complete. 🐄"
attrs:
tags: [ heavy_check_mark ]
priority: 1
```
GitHub Actions[¶](https://docs.ntfy.sh/examples#github-actions "Permanent link")
--------------------------------------------------------------------------------
You can send a message during a workflow run with curl. Here is an example sending info about the repo, commit and job status.
```
- name: Actions Ntfy
run: |
curl \
-u ${{ secrets.NTFY_CRED }} \
-H "Title: Title here" \
-H "Content-Type: text/plain" \
-d $'Repo: ${{ github.repository }}\nCommit: ${{ github.sha }}\nRef: ${{ github.ref }}\nStatus: ${{ job.status}}' \
${{ secrets.NTFY_URL }}
```
Changedetection.io[¶](https://docs.ntfy.sh/examples#changedetectionio "Permanent link")
---------------------------------------------------------------------------------------
ntfy is an excellent choice for getting notifications when a website has a change sent to your mobile (or desktop), [changedetection.io](https://changedetection.io/) or on GitHub ([dgtlmoon/changedetection.io](https://github.com/dgtlmoon/changedetection.io)) uses [apprise](https://github.com/caronc/apprise) library for notification integrations.
To add any ntfy(s) notification to a website change simply add the [ntfy style URL](https://github.com/caronc/apprise/wiki/Notify_ntfy) to the notification list.
For example `ntfy://{topic}` or `ntfy://{user}:{password}@{host}:{port}/{topics}`
In your changedetection.io installation, click `Edit`>`Notifications` on a single website watch (or group) then add the special ntfy Apprise Notification URL to the Notification List.

Watchtower (shoutrrr)[¶](https://docs.ntfy.sh/examples#watchtower-shoutrrr "Permanent link")
--------------------------------------------------------------------------------------------
You can use [shoutrrr](https://containrrr.dev/shoutrrr/latest/services/ntfy/) to send [Watchtower](https://github.com/containrrr/watchtower/) notifications to your ntfy topic.
Example docker-compose.yml:
```
services:
watchtower:
image: containrrr/watchtower
environment:
- WATCHTOWER_NOTIFICATION_SKIP_TITLE=True
- WATCHTOWER_NOTIFICATION_URL=ntfy://ntfy.sh/my_watchtower_topic?title=WatchtowerUpdates
```
The environment variable `WATCHTOWER_NOTIFICATION_SKIP_TITLE` is required to prevent Watchtower from [replacing the `title` query parameter](https://containrrr.dev/watchtower/notifications/#settings). If omitted, the provided notification title will not be used.
Or, if you only want to send notifications using shoutrrr:
```
shoutrrr send -u "ntfy://ntfy.sh/my_watchtower_topic?title=WatchtowerUpdates" -m "testMessage"
```
Authentication tokens are also supported:
* (Recommended) Ntfy url format (replace the domain, topic and token with your own):
```
ntfy://:TOKEN@DOMAIN/TOPIC
```
* Generic webhook and authorization header using this url format (replace the domain, topic and token with your own):
```
generic+https://DOMAIN/TOPIC?@authorization=Bearer+TOKEN`
```
Sonarr, Radarr, Lidarr, Readarr, Prowlarr, SABnzbd[¶](https://docs.ntfy.sh/examples#sonarr-radarr-lidarr-readarr-prowlarr-sabnzbd "Permanent link")
---------------------------------------------------------------------------------------------------------------------------------------------------
Radarr, Prowlarr, and Sonarr v4 support ntfy natively under Settings > Connect.
Sonarr v3, Readarr, and SABnzbd support custom scripts for downloads, warnings, grabs, etc. Some simple bash scripts to achieve this are kindly provided in [nickexyz's ntfy-shellscripts repository](https://github.com/nickexyz/ntfy-shellscripts).
Node-RED[¶](https://docs.ntfy.sh/examples#node-red "Permanent link")
--------------------------------------------------------------------
You can use the HTTP request node to send messages with [Node-RED](https://nodered.org/), some examples:
Example: Send a message (click to expand)
```
[
{
"id": "c956e688cc74ad8e",
"type": "http request",
"z": "fabdd7a3.4045a",
"name": "ntfy.sh",
"method": "POST",
"ret": "txt",
"paytoqs": "ignore",
"url": "https://ntfy.sh/mytopic",
"tls": "",
"persist": false,
"proxy": "",
"authType": "",
"senderr": false,
"credentials":
{
"user": "",
"password": ""
},
"x": 590,
"y": 3160,
"wires":
[
[]
]
},
{
"id": "32ee1eade51fae50",
"type": "function",
"z": "fabdd7a3.4045a",
"name": "data",
"func": "msg.payload = \"Something happened\";\nmsg.headers = {};\nmsg.headers['tags'] = 'house';\nmsg.headers['X-Title'] = 'Home Assistant';\n\nreturn msg;",
"outputs": 1,
"noerr": 0,
"initialize": "",
"finalize": "",
"libs": [],
"x": 470,
"y": 3160,
"wires":
[
[
"c956e688cc74ad8e"
]
]
},
{
"id": "b287e59cd2311815",
"type": "inject",
"z": "fabdd7a3.4045a",
"name": "Manual start",
"props":
[
{
"p": "payload"
},
{
"p": "topic",
"vt": "str"
}
],
"repeat": "",
"crontab": "",
"once": false,
"onceDelay": "20",
"topic": "",
"payload": "",
"payloadType": "date",
"x": 330,
"y": 3160,
"wires":
[
[
"32ee1eade51fae50"
]
]
}
]
```

Example: Send a picture (click to expand)
```
[
{
"id": "d135a13eadeb9d6d",
"type": "http request",
"z": "fabdd7a3.4045a",
"name": "Download image",
"method": "GET",
"ret": "bin",
"paytoqs": "ignore",
"url": "https://www.google.com/images/branding/googlelogo/1x/googlelogo_color_272x92dp.png",
"tls": "",
"persist": false,
"proxy": "",
"authType": "",
"senderr": false,
"credentials":
{
"user": "",
"password": ""
},
"x": 490,
"y": 3320,
"wires":
[
[
"6e75bc41d2ec4a03"
]
]
},
{
"id": "6e75bc41d2ec4a03",
"type": "function",
"z": "fabdd7a3.4045a",
"name": "data",
"func": "msg.payload = msg.payload;\nmsg.headers = {};\nmsg.headers['tags'] = 'house';\nmsg.headers['X-Title'] = 'Home Assistant - Picture';\n\nreturn msg;",
"outputs": 1,
"noerr": 0,
"initialize": "",
"finalize": "",
"libs": [],
"x": 650,
"y": 3320,
"wires":
[
[
"eb160615b6ceda98"
]
]
},
{
"id": "eb160615b6ceda98",
"type": "http request",
"z": "fabdd7a3.4045a",
"name": "ntfy.sh",
"method": "PUT",
"ret": "bin",
"paytoqs": "ignore",
"url": "https://ntfy.sh/mytopic",
"tls": "",
"persist": false,
"proxy": "",
"authType": "",
"senderr": false,
"credentials":
{
"user": "",
"password": ""
},
"x": 770,
"y": 3320,
"wires":
[
[]
]
},
{
"id": "5b8dbf15c8a7a3a5",
"type": "inject",
"z": "fabdd7a3.4045a",
"name": "Manual start",
"props":
[
{
"p": "payload"
},
{
"p": "topic",
"vt": "str"
}
],
"repeat": "",
"crontab": "",
"once": false,
"onceDelay": "20",
"topic": "",
"payload": "",
"payloadType": "date",
"x": 310,
"y": 3320,
"wires":
[
[
"d135a13eadeb9d6d"
]
]
}
]
```

Gatus[¶](https://docs.ntfy.sh/examples#gatus "Permanent link")
--------------------------------------------------------------
To use ntfy with [Gatus](https://github.com/TwiN/gatus), you can use the `ntfy` alerting provider like so:
```
alerting:
ntfy:
url: "https://ntfy.sh"
topic: "YOUR_NTFY_TOPIC"
priority: 3
```
For more information on using ntfy with Gatus, refer to [Configuring ntfy alerts](https://github.com/TwiN/gatus#configuring-ntfy-alerts).
Alternative: Using the custom alerting provider
```
alerting:
custom:
url: "https://ntfy.sh"
method: "POST"
body: |
{
"topic": "mytopic",
"message": "[ENDPOINT_NAME] - [ALERT_DESCRIPTION]",
"title": "Gatus",
"tags": ["[ALERT_TRIGGERED_OR_RESOLVED]"],
"priority": 3
}
default-alert:
enabled: true
description: "health check failed"
send-on-resolved: true
failure-threshold: 3
success-threshold: 3
placeholders:
ALERT_TRIGGERED_OR_RESOLVED:
TRIGGERED: "warning"
RESOLVED: "white_check_mark"
```
Jellyseerr/Overseerr webhook[¶](https://docs.ntfy.sh/examples#jellyseerroverseerr-webhook "Permanent link")
-----------------------------------------------------------------------------------------------------------
Here is an example for [jellyseerr](https://github.com/Fallenbagel/jellyseerr)/[overseerr](https://overseerr.dev/) webhook JSON payload. Remember to change the `https://request.example.com` to your URL as the value of the JSON key click. And if you're not using the request `topic`, make sure to change it in the JSON payload to your topic.
```
{
"topic": "requests",
"title": "{{event}}",
"message": "{{subject}}\n{{message}}\n\nRequested by: {{requestedBy_username}}\n\nStatus: {{media_status}}\nRequest Id: {{request_id}}",
"priority": 4,
"attach": "{{image}}",
"click": "https://requests.example.com/{{media_type}}/{{media_tmdbid}}"
}
```
Home Assistant[¶](https://docs.ntfy.sh/examples#home-assistant "Permanent link")
--------------------------------------------------------------------------------
Here is an example for the configuration.yml file to setup a REST notify component. Since Home Assistant is going to POST JSON, you need to specify the root of your ntfy resource.
```
notify:
- name: ntfy
platform: rest
method: POST_JSON
data:
topic: YOUR_NTFY_TOPIC
title_param_name: title
message_param_name: message
resource: https://ntfy.sh
```
If you need to authenticate to your ntfy resource, define the authentication, username and password as below:
```
notify:
- name: ntfy
platform: rest
method: POST_JSON
authentication: basic
username: YOUR_USERNAME
password: YOUR_PASSWORD
data:
topic: YOUR_NTFY_TOPIC
title_param_name: title
message_param_name: message
resource: https://ntfy.sh
```
If you need to add any other [ntfy specific parameters](https://ntfy.sh/docs/publish/#publish-as-json) such as priority, tags, etc., add them to the `data` array in the example yml. For example:
```
notify:
- name: ntfy
platform: rest
method: POST_JSON
data:
topic: YOUR_NTFY_TOPIC
priority: 4
title_param_name: title
message_param_name: message
resource: https://ntfy.sh
```
Uptime Kuma[¶](https://docs.ntfy.sh/examples#uptime-kuma "Permanent link")
--------------------------------------------------------------------------
Go to your [Uptime Kuma](https://github.com/louislam/uptime-kuma) Settings > Notifications, click on **Setup Notification**. Then set your desired **title** (e.g. "Uptime Kuma"), **ntfy topic**, **Server URL** and **priority (1-5)**:
[](https://docs.ntfy.sh/static/img/uptimekuma-settings.png)[](https://docs.ntfy.sh/static/img/uptimekuma-setup.png)
You can now test the notifications and apply them to monitors:
[](https://docs.ntfy.sh/static/img/uptimekuma-ios-test.jpg)[](https://docs.ntfy.sh/static/img/uptimekuma-ios-down.jpg)[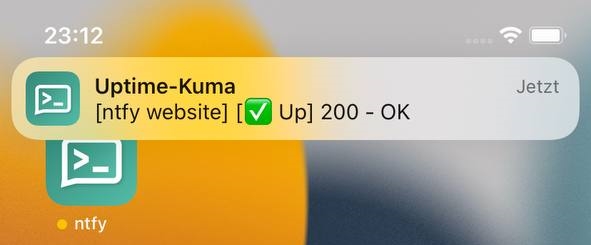](https://docs.ntfy.sh/static/img/uptimekuma-ios-up.jpg)
UptimeRobot[¶](https://docs.ntfy.sh/examples#uptimerobot "Permanent link")
--------------------------------------------------------------------------
Go to your [UptimeRobot](https://github.com/uptimerobot) My Settings > Alert Contacts > Add Alert Contact Select **Alert Contact Type** = Webhook. Then set your desired **Friendly Name** (e.g. "ntfy-sh-UP"), **URL to Notify**, **POST value** and select checkbox **Send as JSON (application/json)**. Make sure to send the JSON POST request to ntfy.domain.com without the topic name in the url and include the "topic" name in the JSON body.
[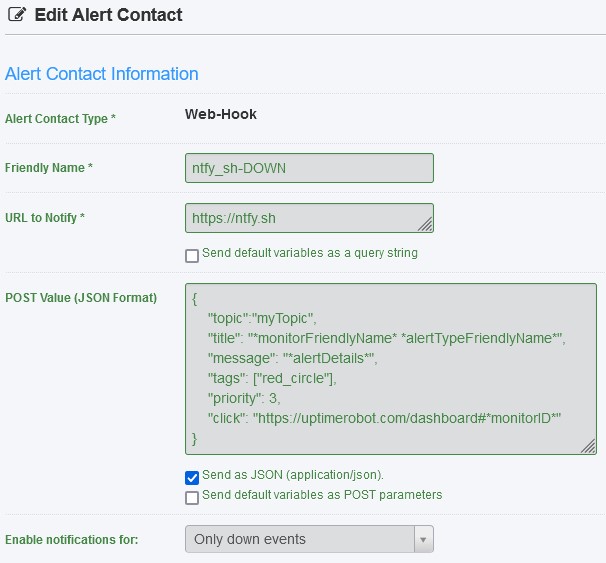](https://docs.ntfy.sh/static/img/uptimerobot-setup.jpg)
```
{
"topic":"myTopic",
"title": "*monitorFriendlyName* *alertTypeFriendlyName*",
"message": "*alertDetails*",
"tags": ["green_circle"],
"priority": 3,
"click": https://uptimerobot.com/dashboard#*monitorID*
}
```
You can create two Alert Contacts each with a different icon and priority, for example:
```
{
"topic":"myTopic",
"title": "*monitorFriendlyName* *alertTypeFriendlyName*",
"message": "*alertDetails*",
"tags": ["red_circle"],
"priority": 3,
"click": https://uptimerobot.com/dashboard#*monitorID*
}
```
You can now add the created Alerts Contact(s) to the monitor(s) and test the notifications:
[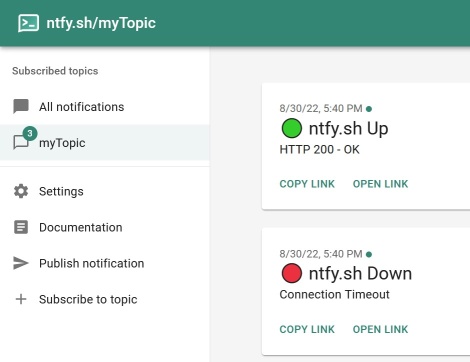](https://docs.ntfy.sh/static/img/uptimerobot-test.jpg)
Apprise[¶](https://docs.ntfy.sh/examples#apprise "Permanent link")
------------------------------------------------------------------
ntfy is integrated natively into [Apprise](https://github.com/caronc/apprise) (also check out the [Apprise/ntfy wiki page](https://github.com/caronc/apprise/wiki/Notify_ntfy)).
You can use it like this:
```
apprise -vv -t "Test Message Title" -b "Test Message Body" \
ntfy://mytopic
```
Or with your own server like this:
```
apprise -vv -t "Test Message Title" -b "Test Message Body" \
ntfy://ntfy.example.com/mytopic
```
Rundeck[¶](https://docs.ntfy.sh/examples#rundeck "Permanent link")
------------------------------------------------------------------
Rundeck by default sends only HTML email which is not processed by ntfy SMTP server. Append following configurations to [rundeck-config.properties](https://docs.rundeck.com/docs/administration/configuration/config-file-reference.html) :
```
# Template
rundeck.mail.template.file=/path/to/template.html
rundeck.mail.template.log.formatted=false
```
Example `template.html`:
```
Execution ${execution.id} was ${execution.status}
```
Add notification on Rundeck (attachment type must be: `Attached as file to email`): 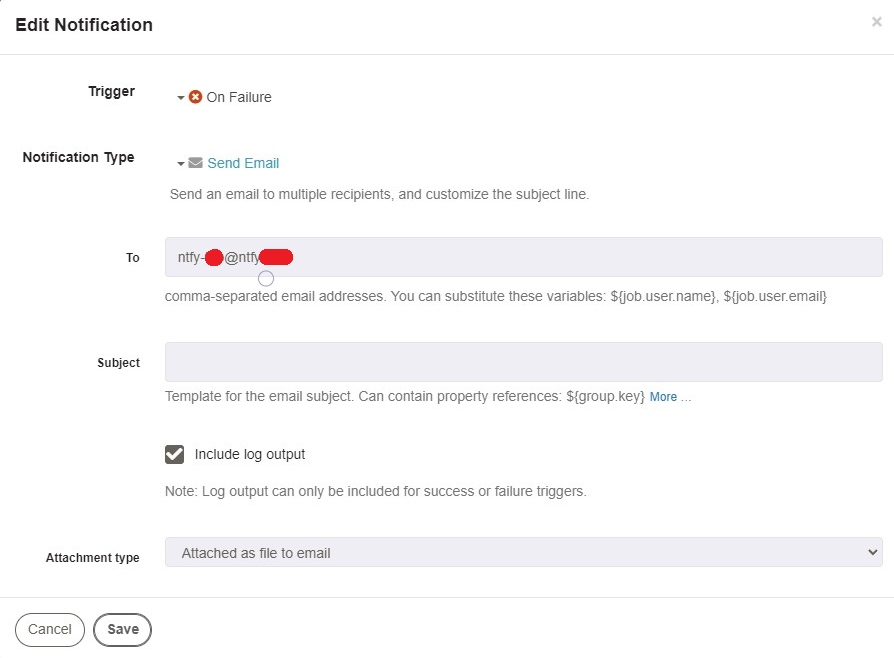
Traccar[¶](https://docs.ntfy.sh/examples#traccar "Permanent link")
------------------------------------------------------------------
This will only work on selfhosted [traccar](https://www.traccar.org/) ([Github](https://github.com/traccar/traccar)) instances, as you need to be able to set `sms.http.*` keys, which is not possible through the UI attributes
The easiest way to integrate traccar with ntfy, is to configure ntfy as the SMS provider for your instance. You then can set your ntfy topic as your account's phone number in traccar. Sending the email notifications to ntfy will not work, as ntfy does not support HTML emails.
**Info:** Add a phone number to your traccar account not in device, as otherwise it will not try to send SMS.
**Caution:** JSON publishing is only possible, when POST-ing to the root URL of the ntfy instance. (see [documentation](https://docs.ntfy.sh/publish/#publish-as-json))
```
https://ntfy.sh
{
"topic": "{phone}",
"message": "{message}"
}
```
If [access control](https://docs.ntfy.sh/config/#access-control) is enabled, and the target topic does not support anonymous writes, you'll also have to provide an authorization header, for example in form of a privileged token
```
Bearer tk_JhbsnoMrgy2FcfHeofv97Pi5uXaZZ
```
or by simply providing traccar with a valid username/password combination.
```
phil
mypass
```
Terminal Notifications for Long-Running Commands[¶](https://docs.ntfy.sh/examples#terminal-notifications-for-long-running-commands "Permanent link")
----------------------------------------------------------------------------------------------------------------------------------------------------
This example provides a simple way to send notifications using [ntfy.sh](https://ntfy.sh/) when a terminal command completes. It includes success or failure indicators based on the command's exit status.
Store your ntfy.sh bearer token securely if access control is enabled:
```
echo "your_bearer_token_here" > ~/.ntfy_token
chmod 600 ~/.ntfy_token
```
Add the following function and alias to your `.bashrc` or `.bash_profile`:
```
# Function for alert notifications using ntfy.sh
notify_via_ntfy() {
local exit_status=$? # Capture the exit status before doing anything else
local token=$(< ~/.ntfy_token) # Securely read the token
local status_icon="$([ $exit_status -eq 0 ] && echo magic_wand || echo warning)"
local last_command=$(history | tail -n1 | sed -e 's/^[[:space:]]*[0-9]\{1,\}[[:space:]]*//' -e 's/[;&|][[:space:]]*alert$//')
curl -s -X POST "https://n.example.dev/alerts" \
-H "Authorization: Bearer $token" \
-H "Title: Terminal" \
-H "X-Priority: 3" \
-H "Tags: $status_icon" \
-d "Command: $last_command (Exit: $exit_status)"
echo "Tags: $status_icon"
echo "$last_command (Exit: $exit_status)"
}
# Add an "alert" alias for long running commands using ntfy.sh
alias alert='notify_via_ntfy'
```
Now you can run any long-running command and append `alert` to notify when it completes:
```
sleep 10; alert
```
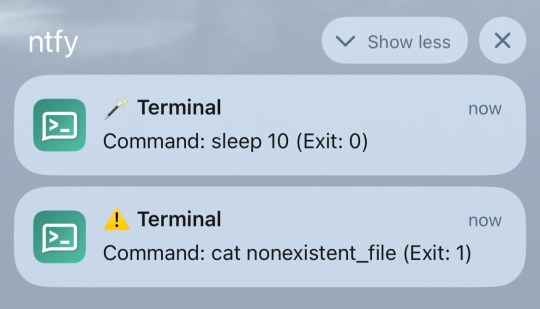
**Notification Sent** with a success 🪄 (`magic_wand`) or failure ⚠️ (`warning`) tag.
To test failure notifications:
```
false; alert # Always fails (exit 1)
ls --invalid; alert # Invalid option
cat nonexistent_file; alert # File not found
```